Returning multiple outputs from a TensorRT model inference
TensorRT is the de facto SDK for optimizing neural network inference on Nvidia devices. There are some great resources out there for using TensorRT, but there is one question I did not find answer anywhere:
How to return multiple output bindings from a TensorRT model?
Input and output bindings in TensorRT correspond to input and output layers in neural networks. It’s easy to run inference on a model with a single input and output binding. But imagine the following scenario: you have a neural network with a single input and multiple outputs. How would you get all the outputs for an input in one pass?
I have found only few tutorials for TensorRT inference using the c++ API:
- The noahmr/yolov5-tensorrt repository
- docs.nvidia.com tutorial
- another docs.nvidia.com tutorial
- TensorRT github samples
I didn’t think none of these was conclusive the first time I was studying TensorRT. Moreover, none of these examples has multiple input / output layers (or in TensorRT model terms, ‘bindings’). However, now I have spent almost a year with TensorRT so all of this has become quite clear to me. It’s a little bit difficult to explain shortly so I will give you two answers.
Short answer:
Copy the input data from CPU to GPU before the inference using cudaMemcpyAsync() with the flag cudaMemcpyHostToDevice
Then run enqueueV2() that takes your input and output bindings as an input.
All of them.
After that you can copy the results of the inference from GPU to CPU using cudaMemcpyAsync().
This time with the flag cudaMemcpyDeviceToHost.
I’m not sure if you can copy it in one pass or if you have to do it separately for all output bindings.
If they are one block in the memory this step can be done in one go.
Finally, after you’ve copied all the data from device memory to output host memory you can call waitForCompletion() to synchronize the CUDA streams.
This is the answer I was looking for but found nowhere: just copy the correct data to all necessary input bindings before inference and copy the data from all output bindings after it using cudaMemcpyAsync. Easy.
Long answer:
I’m going to walk you through all the necessary code to run a model with one input and thee output bindings.
Index
The model
We are using the ELG model from swook/GazeML repository as our example. Please use my fork of the repository that includes some bugfixes. Let’s start off by cloning the repo.
git clone git@github.com:Hyrtsi/GazeML.git
We need Python 3.7 to run this code. Download it here. Just take one like this, take either gzip or tarball and follow these instructions. Verify your installation by typing python3.7 in your terminal. Something like this should show up
$ python3.7
Python 3.7.12 (default, Mar 11 2022, 12:03:27)
[GCC 9.4.0] on linux
Type "help", "copyright", "credits" or "license" for more information.
>>>
After that you need to create a python virtual environment (venv) to avoid messing up your system. You can use conda instead if you prefer that. Discussion here and here.
Run the following inside GazeML repository root folder:
python3.7 -m venv .venv
source .venv/bin/activate
This command created a folder named .venv that has all the package information for your virtual environment. If you want to exit the venv just type deactivate at any time. Now let’s install all necessary packages using pip:
pip install --upgrade pip
pip install cython
pip install scipy
python3 setup.py install
pip install tensorflow==1.14
pip install tensorflow-gpu==1.14
I tried using Tensorflow 2.x with this repository but it didn’t work. I also tried using tensorflow==1.15 but it didn’t work either. Be careful with the package versions.
Download trained weights
bash get_trained_weights.bash
Run the demo
cd src
python3 elg_demo.py
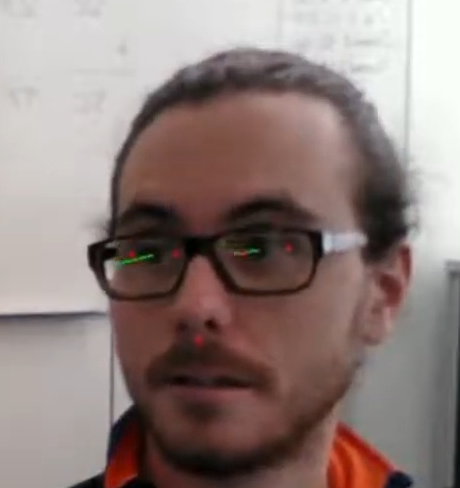
You should see your face with your webcam, the eyelids, iris and gaze direction.
Convert the model to ONNX
Next we have to convert the model from TensorFlow file format to .onnx and then from .onnx to .engine. ONNX is a nexus between different pretrained neural network file formats. It lets us convert the TensorFlow model to TensorRT.
Now that we have downloaded the weights we need to use this amazing opensource tool, tf2onnx, to convert the model.
pip install -U tf2onnx
If you ran the code you should have a folder named tmp that has the saved-model file: saved_model.pb.
You can convert that file to .onnx like so:
python3 -m tf2onnx.convert --saved-model ./tmp --output gazeml.onnx
For most of your needs that should be enough. You can add --opset <opset> for example --opset 10 if you want to target a specific opset. You can also add --target tensorrt or similar. Check the here for more flags if you need them.
There will be a lot of prints in the console. Check for any errors. If everything went well you should have now an .onnx file of the ELG model.
Convert the model to TensorRT .engine
Now we are stepping into TensorRT world. It means we need to install some dependencies.
Check that you have a CUDA capable GPU.
Install CUDA
Find the steps for your system here. For Ubuntu 20.04 and CUDA 11.7:
wget https://developer.download.nvidia.com/compute/cuda/repos/ubuntu2004/x86_64/cuda-ubuntu2004.pin
sudo mv cuda-ubuntu2004.pin /etc/apt/preferences.d/cuda-repository-pin-600
wget https://developer.download.nvidia.com/compute/cuda/11.7.0/local_installers/cuda-repo-ubuntu2004-11-7-local_11.7.0-515.43.04-1_amd64.deb
sudo dpkg -i cuda-repo-ubuntu2004-11-7-local_11.7.0-515.43.04-1_amd64.deb
sudo cp /var/cuda-repo-ubuntu2004-11-7-local/cuda-*-keyring.gpg /usr/share/keyrings/
sudo apt-get update
sudo apt-get -y install cuda
Note: this depends on nvidia-driver-515. If you have an older version replace the last step in the command above with sudo aptitude install cuda to resolve conflicts or do this:
sudo apt-get remove --purge nvidia-*
sudo apt-get remove --purge *nvidia*
This removes all apt packages related to nvidia. They will be reinstalled upon cuda installation.
Reboot your PC
sudo reboot now
and check the output of nvidia-smi to verify your installation.
nvidia-smi
It should look something like this
$nvidia-smi
Mon Jun  6 22:08:22 2022
+-----------------------------------------------------------------------------+
| NVIDIA-SMI 510.60.02    Driver Version: 510.60.02    CUDA Version: 11.6     |
|-------------------------------+----------------------+----------------------+
| GPU  Name        Persistence-M| Bus-Id        Disp.A | Volatile Uncorr. ECC |
| Fan  Temp  Perf  Pwr:Usage/Cap|         Memory-Usage | GPU-Util  Compute M. |
|                               |                      |               MIG M. |
|===============================+======================+======================|
|   0  NVIDIA GeForce ...  Off  | 00000000:01:00.0  On |                  N/A |
| N/A   58C    P8    17W /  N/A |    874MiB / 16384MiB |     26%      Default |
|                               |                      |                  N/A |
+-------------------------------+----------------------+----------------------+
Install TensorRT
Follow these steps. You need to register to Nvidia portal. It’s free.
Download TensorRT repo here.
For TensorRT 8.2.3.0, Ubuntu 20.04 and CUDA >= 11.4 the installation goes like this:
sudo dpkg -i nv-tensorrt-repo-ubuntu2004-cuda11.4-trt8.2.3.0-ga-20220113_1-1_amd64.deb
sudo apt-key add /var/nv-tensorrt-repo-ubuntu2004-cuda11.4-trt8.2.3.0-ga-20220113/*.pub
sudo apt-get update
sudo apt-get install tensorrt
You should be able to convert the model next using trtexec, TensorRT’s own engine converter tool
/usr/src/tensorrt/bin/trtexec --onnx=gazeml.onnx --saveEngine=gazeml.engine --fp16 --workspace=3000 --buildOnly
Congratulations. Now you have the model. Let’s use it for something cool next.
Loading TensorRT .engine in c++
We will base our code to this amazing repository.
We start with setting the engine up.
Create inference runtime:
nvinfer1::IRuntime* trtRuntime = nvinfer1::createInferRuntime(*logger);
This call requires us to inherit nvinfer1::ILogger (sources found in NvInferRuntimeCommon.h) and pass that logger for the runtime. A closer look at the ILogger class reveals that it has a virtual function log(). If you implement your own logger you must also implement this method. Here is a minimal example that does’t take the severity into account:
class Logger : nvinfer1::ILogger final
{
    void log(nvinfer1::ILogger::Severity severity, char const* msg) override
    {
        printf("%s\n", msg);
    }
};
After we’ve set up the logger and runtime, it’s time to load the engine. First decode the engine file
bool loadEngine(const std::string& engineFilePath)
{
    std::ifstream engineFileStream(engineFilePath, std::ios::binary);
    if (not engineFileStream.good())
    {
        printf("Could not read engine from file %s\n", engineFilePath.c_str());
        return false;
    }

    std::vector<char> engineData(std::istreambuf_iterator<char>(engineFileStream), {});
    engineFileStream.close();

    printf("Loaded %zu bytes of engine data\n", engineData.size());

    std::unique_ptr<nvinfer1::ICudaEngine> engine(
            m_trtRuntime->deserializeCudaEngine(engineData.data(), engineData.size()));
    if (not engine)
    {
        printf("Could not create engine\n");
        return false;
    }

    return true;
}
Then create execution context
    std::unique_ptr<nvinfer1::IExecutionContext> executionContext(
        engine->createExecutionContext());
    if (not executionContext)
    {
        m_logger->log(LogLevel::kERROR,
            "[Engine] failure: could not create execution context");
        return false;
    }
Create bindings
You can see the bindings like this:
void printBindings(
            const std::unique_ptr<nvinfer1::ICudaEngine>& engine) noexcept
{
    const int32_t nBindings = engine->getNbBindings();
    if (nBindings == 0)
    {
        printf("Warning: did not find any bindings in the engine\n");
    }

    for (int i = 0; i < nBindings; ++i)
    {
        std::string bindingDims{""};
        for (int j = 0; j < engine->getBindingDimensions(i).nbDims; ++j)
        {
            bindingDims += std::to_string(engine->getBindingDimensions(i).d[j]) + std::string("x");
        }

        if (bindingDims.size() > 0)
        {
            bindingDims.pop_back();
        }

        printf("Binding %d: %s %s %s\n",
            i,
            engine->getBindingName(i),
            bindingDims.c_str(),
            engine->bindingIsInput(i) ? "input" : "output");
    }
}
Make sure you check the bindings. There is no single way to define them and they can vary a lot from model to model. So you have to pay attention that you have loaded the correct model with the inputs and outputs you expect it to have. You need to check the layer names so you understand which layer is which.
We expect to get this output when we run the above code
Binding 0 - __eye_index 2 input
Binding 1 - __eye 2x36x60x1 input
Binding 2 - __frame_index 2 input
Binding 3 - landmarks 2x18x2 output
Binding 4 - radius 2x1 output
Binding 5 - heatmaps 2x36x60x18 output
Binding 6 - eye 2x36x60x1 output
Binding 7 - frame_index 2 output
Binding 8 - eye_index 2 output
We can compare this to the graph of the model using netron.app. Just drag and drop your onnx model to the app. It doesn’t work with TensorRT models but the inputs and outputs of the onnx model are the same. I’m not going to show the entire model graph here because it’s huge. But here are the inputs
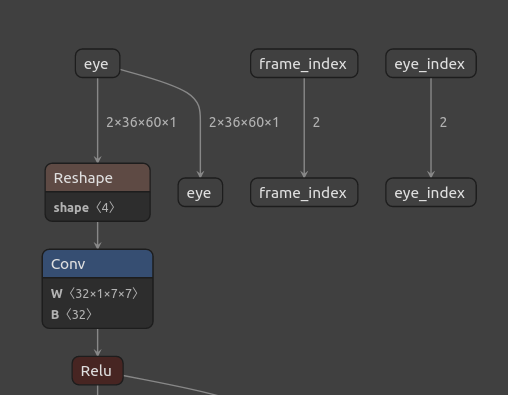
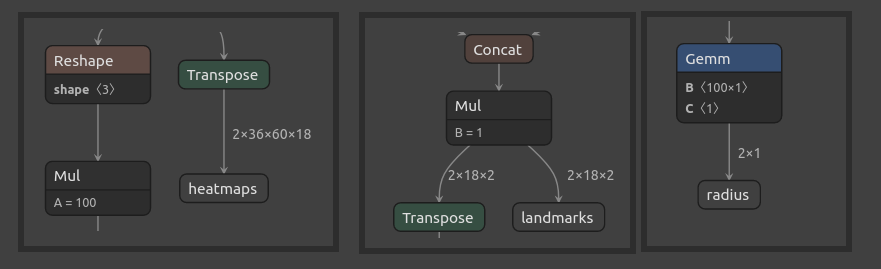
and here are the outputs
so the sizes seem to match. If you studied the GazeML ELG paper carefully you see that the bindings we need are:
- Inputs:
- Binding 1, name:
__eye, size:2x36x60x1
- Binding 1, name:
- Outputs:
- Binding 3, name:
landmarks, size:2x18x2 - Binding 4, name:
radius, size:2x1 - Binding 5, name:
heatmaps, size:2x36x60x18
- Binding 3, name:
Set up memory
We need to set up a few buffers next.
First we need to allocate space for input and output bindings.
We use floats in this example so we need 2*36*60 floats for the input, 2*18*2 + 2 + 2*36*60*18 floats for the output.
It’s not clear if we need to allocate space for all inputs and outputs even if they’re not used. In the example code below we will allocate space for all bindings.
The function cudaMalloc() is used to reserve space for the bindings on the device:
bool reserveDeviceMemory(std::vector<void*>& deviceMemory,
    const std::unique_ptr<nvinfer1::ICudaEngine>& engine)
{
    for (int i = 0; i < engine->getNbBindings(); ++i)
    {
        const nvinfer1::Dims dims = engine->getBindingDimensions(i);

        // This many floats we need to reserve from the GPU
        const int volume = dimsVolume(dims);

        deviceMemory.push_back(nullptr);
        void** ptr = &m_deviceMemory.back();
        if (cudaMalloc(ptr, volume * sizeof(float)) != 0 or *ptr == nullptr)
        {
            printf("Error: Cannot allocate %d floats from GPU for binding %d\n",
                volume,
                i);
            return false;
        }
    }

    return true;
}
where the function dimsVolume() returns the volume of the elements i.e. the sum of the elements:
int32_t dimsVolume(const nvinfer1::Dims& dims) noexcept
{
    int32_t ret = 0;
    if (dims.nbDims > 0)
    {
        ret = 1;
    }

    for (size_t i = 0; i < dims.nbDims; ++i)
    {
        ret = ret * dims.d[i];
    }

    return ret;
}
Remember that you have the responsibility to free the GPU memory after calling cudaMalloc() when you terminate your program.
If you use a class the destructor is the suitable place for this.
void freeDeviceMemory(std::vector<void*>& deviceMemory)
{
    for (auto& elem : deviceMemory)
    {
        if (elem)
        {
            cudaFree(elem);
        }
    }
    deviceMemory.clear();
}
Also remember: allocating and freeing memory from CPU or GPU costs time. You don’t have to reserve space on GPU using cudaMalloc() every time since your model/bindings doesn’t change. You can do allocating once in the startup and freeing once in the shutdown.
Preprocessing and Inference
When you acquire a neural network model you have to know exactly how to feed the data to it.
You must know the bit endianness, the input size, datatype and preprocessing.
The raw RGB pixel values are usually converted to floats and scaled between 0...1 or -0.5...+0.5.
Many models use greyscale images instead of RGB.
You can find the amount of color channels and the image size (width x height) from the input bindings.
But it doesn’t tell you how to preprocess the frame.
Be mindful of this and remember to include preprocessing in your model if you’re creating your own models.
We will not include preprocessing code here. Common mistakes are to forget to do it entirely, have the data scaled differently from what the model creators have or copy a wrong size buffer.
Code for inference:
bool infer(const cv::Mat& frame,
    std::vector<void*>& deviceMemory,
    std::unique_ptr<nvinfer1::IExecutionContext>& executionContext,
    const std::unique_ptr<nvinfer1::ICudaEngine>& engine)
{
    // Copying the input data from CPU to GPU
    constexpr size_t inputBindingIndex{1}; // Change this to your input binding index if needed
    const auto copyCpuToGpuOk = cudaMemcpyAsync(static_cast<float*>(deviceMemory.at(inputBindingIndex)),
        static_cast<void*>(frame.data),
        static_cast<int>(frame.channels * frame.size().area() * sizeof(float)),
        cudaMemcpyHostToDevice,
        nullptr);

    if (copyCpuToGpuOk != cudaSuccess)
    {
        printf("Error: could not copy frame from CPU to GPU\n");
        return false;
    }

    if (not executionContext->enqueueV2(static_cast<void**>(deviceMemory.data()), nullptr, nullptr))
    {
        printf("Error: enqueue failed\n");
        return false;
    }

    // Finished inference. Time to copy the results from GPU to CPU

    std::vector<float> outputHostMemory; // Collect the results of the neural network here
    const size_t outputVolume = getOutputVolume(engine); // See code snippet below
    outputHostMemory.resize(outputVolume);

    constexpr size_t startBindingIndex{3};
    const auto copyGpuToCpuOk = cudaMemcpyAsync(
        static_cast<void**>(outputHostMemory.data()),
        static_cast<void*>(deviceMemory.at(startBindingIndex)),
        static_cast<int>(outputVolume * sizeof(float)),
        cudaMemcpyDeviceToHost,
        nullptr);

    return true;
}
Bonus: you can replace the last element of cudaMemcpyAsync with your cudastream.
You can test if that makes the processing faster or not on your device.
We will find the volume of all necessary output bindings:
size_t getOutputVolume(const std::unique_ptr<nvinfer1::ICudaEngine>& engine)
{
    size_t outputVolume{0};

    // We need outputs from only bindings 3, 4 and 5
    // If you need them from all bindings, use a for loop here

    outputVolume += dimsVolume(engine.getBindingDimensions(3));
    outputVolume += dimsVolume(engine.getBindingDimensions(4));
    outputVolume += dimsVolume(engine.getBindingDimensions(5));

    return outputVolume;
}
Now you have the result of the inference as a vector of float.
The first 2x18x2 = 72 floats are the values of landmarks. Then, two floats representing the radius of each eye. And finally, 2x36x60x18 = 77760 floats that form the heatmaps.
I hope this article helped you. I will write about basic TensorRT topics in the future.